| Home | Presses | Intro | Site Map | P.R. | Chemicals | Answers |

|
| Prices | Specials | How To | Bullets | B.Makers | Books | Classified | |
| Topics | Jackets | Terms | Training | Software | Products | Contact us |
| Home | Presses | Intro | Site Map | P.R. | Chemicals | Answers |
|
| Prices | Specials | How To | Bullets | B.Makers | Books | Classified | |
| Topics | Jackets | Terms | Training | Software | Products | Contact us |

|
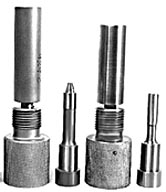 JSWC-2 2-die Set
The JSWC-2 consists of two dies, the core swage (CSW-1) and the core seater (CS-1). These can be type -S or type -H, for either the S-press (CSP-1) or the Mega Mite press (CSP-2) or Hydro Press (CHP-1). The purpose is to form an exact weight of lead core in the first die, which fits into a jacket, and the seat the core into the jacket in the second die, expanding the bullet and forming the nose and base at the same time. The bullet nose is formed in a cavity in the end of the internal core seat punch. This means that the punch will require some minimum thickness of edge for strength. The heated steel alloy used by Corbin allows a minimum of about 0.015 inches for the edge thickness, which in turn means that there must be a .015 inch shoulder between the nose and the shank of the SWC bullet. It would not be possible to make a durable punch with a zero thickness edge, which would be required if one were to make a bullet without a step in this kind of die. The benefit is that you can change the nose shape simply by changing the internal punch. The dies and other punches are the same. 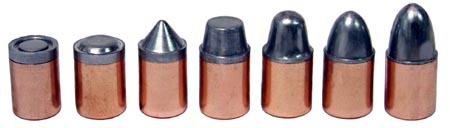 The lead core diameter must fit into the bullet jacket easily by hand before it is seated. The seating pressure expands the lead, and the lead in turn expands the jacket until it firmly contacts the die walls. This gives the bullet the final diameter. You can see that one set of dies will make one caliber or diameter of bullet, but the nose and base can be easily changed in seconds by changing punches. The weight is adjusted by the volume of lead used. The precise weight is set by bleeding surplus lead, beyond the volume you set by the position of the external punch, through bleed holes in the side of the first (core swage) die.
|
 The term "SWC" or "Semi-Wadcutter" does NOT refer to a specific nose shape. It only refers to the shoulder between the nose or ogive, and the rest of the bullet. A full wadcutter can also be made. This is just a flat punch, or one with a shallow cavity (button nose) or a raised ring (target wadcutter). A round nose shape needs to be specified in terms of the axial length. A 1/2-E (eliptical shape with a length of half the caliber) is half a round ball. The more common pistol shape is a 3/4-E ogive, which refers to an eliptical nose shape having a length of 3/4 or 0.75 times the caliber. This is similar to the 45 ACP ball ammo.
The 1-E ogive refers to an eliptical shape having a length of one full caliber. This is a typical blackpowder rifle nose shape. The same 3/4-E or 1-E ogive can also be made in a point forming die cavity, thus eliminating the shoulder because the bullet is formed against the solid, curved die wall instead of inside the cavity of a punch (which must have an edge, creating a step by necessity). The step is actually not an issue except for supersonic flight over longer distances, as it adds to the air resistance. But at subsonic velocities (under about 1030 fps) and for moderate distance shooting, the step shoulder of a SWC bullet can help make cleaner holes in paper targets, and add to the effectiveness of hunting bullets. Also, the benefit of economical nose shape changes and lower cost tooling can outweigh the advantage of somewhat lower BC in handgun and lower velocity rifle bullets.  Because the actual nose shape starts at about .030 smaller diameter than the rest of the bullet (twice the .015 shoulder), the actual length of the nose in calibers may be slightly less than the 3/4-E or 1-E terminology indicates. But for all practical purposes, the length is close enough to be considered in caliber terms. For example, a .458 rifle bullet with a 1-E ogive, produced in a point forming die (no shoulder required) would have a nose that is .458 inches long. The same .458 caliber bullet with 1-E ogive made in a JSWC-2 die set would actually have a nose length of .458 less .030 inches, or .428 inches, if the punch cavity is created using a true 1-E elipse curve.
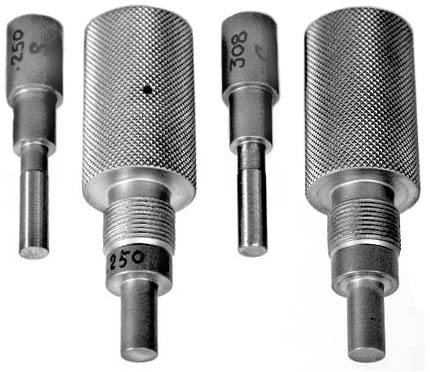 A JSWC-2 die set can be turned into a 3 die set by adding a point forming die. This means you can make smooth ogive lead or jacketed bullets with the set, without the shoulder. However, there is a very small diameter difference required between the core seating die, and point forming die, necessary for proper release when pressure is removed. If the core seater is made at exactly the bullet diameter, say .357 inches for a .38 caliber bullet, then the point former matched to it should be about 0.3571-.3572 inch bore size, not also .3570.
The core seater can be made .0001/.0002 inches smaller than caliber, which normally does not cause any issue with the accuracy (especially if the base is formed using a dish or cup shape, which allows easy and instant expansion to seal chamber pressure). This means the point form die, if added later, can be exactly on caliber if desired. Also, the pressure used in seating the core can make a difference of 100 to 200 millionths of an inch, so when seating a core in the jacket with the intent of shaping a smooth ogive bullet in a point form die, using a little less pressure can give the same effect as using a .0001/.0002 inch undersized core seater or the same amount larger point former. In most cases, a standard JSWC-2 set will work fine with an add-on point former, but in case there is stiff ejection, sticking in the point form die, or penetration of the core with the ejection pin, a slight adjustment to the point form die bore size can be done to make the operation more reliable. |
|
|
| Home Page | Price List | E-Mail Sales | Site Map | New Products | Auto Q&A | Terminology |
| Retirement | Specials | Real Estate | Software | How to swage | Classified Ads | Feedback |