| Home | Presses | Intro | Site Map | P.R. | Chemicals | Answers |

|
| Prices | Specials | How To | Bullets | B.Makers | Books | Classified | |
| Topics | Jackets | Terms | Training | Software | Products | Contact us |
| Home | Presses | Intro | Site Map | P.R. | Chemicals | Answers |
|
| Prices | Specials | How To | Bullets | B.Makers | Books | Classified | |
| Topics | Jackets | Terms | Training | Software | Products | Contact us |

|
Click for Floor Stand |
|
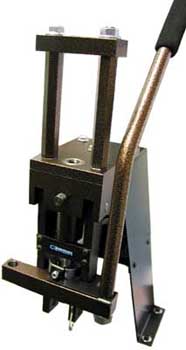
The CSP-B Bench Stand places your CSP-1 S-Press (or earlier Series II press) at a better position for swaging than mounting it directly on a typical reloading bench top. The extra foot of height puts the die and punch alignment more nearly at eye level, when you sit in front of the bench on a chair or shop stool. The handle is raised so that you don't have to reach as far down on the power stroke, making the operation easier on your arm for long production runs. |
|
|
Using the CSP-B Bench Stand gives you back nearly twice as much storage space on top of your bench, compared to mounting the press directly on the bench. First, you get back the entire area under the press, and then you also gain storage area on the combination brace and shelf about half-way up inside the legs of the stand. This space is handy for accessories, dies, or bullet-making supplies.
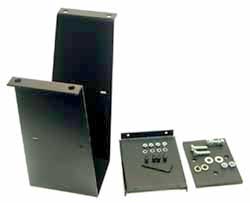
The stand mounts with four 1/4-inch lag bolts or screws to the top of your bench, with the legs as close as practical to the front of the bench. The angled front of the stand places the press slightly further over the edge than you would be able to mount it directly, which is useful for benches that have drawers nearly even with the front edge (because it gives you more clearance for your hand and the press handle on the power stroke). Mounting hardware is not provided because it varies with the type of bench (thick or thin, wood or metal) and can be found at any hardware store. If your bench top is thin, or is made of metal, you will want to consider using large "fender" washers or making a backing block of wood or metal to help stiffen and spread the forces on the mounting nuts. Sheet metal screws are not recommended: use machine screws, washers and nuts to mount the press on metal bench tops or on wood tops less than 3/4-inch thick. The Bench Stand is shipped unassembled. To assemble the stand, first locate and identify all of the parts:
The easy way to assemble the stand is to set the legs upside down and install the shelf, then mount the stand (right-side up) on your bench, and finally install your press and the reinforcing plate once the stand has been securely mounted on the bench.  The 10-32 screws may need to be turned to "screw" into the holes, although the holes are not threaded. Set the shelf into the inverted "V" of the legs, so that the side flanges with the mounting holes face upward, toward the open end of the "V". Line up the holes in the shelf with the holes in the legs, and push or "screw" the 10-32 screws into all four holes, from the outside, so the head of the screw is against the leg of the stand. Then place a number 10 lock washer over the ends of the screws, and finally, fasten a 10-32 hex nut on each screw by hand.
Adjust the shelf position so it is evenly positioned in relation to the front and back of the stand, and then tighten the screws and nuts securely. Turn the stand upright, and mount it on your bench with the sloping front facing forward, toward the bench edge, and the straight back facing the back of the bench. Mount the stand as close to the front of the bench as you can without letting the flanges hang over the edge. 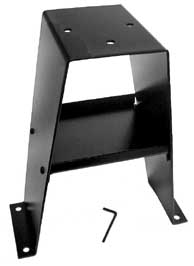 With the stand securely fastened to your bench, place the press on top of the stand and hold it in position with one hand while you place three 5/16-inch SAE washers over the three holes in the mounting flange, and then push three 5/16-inch bolts down through the washers, the press mounting flange, and the top of the stand. Shift your grasp to the mounting flange so you can hold it in place while you put the reinforcing plate under the top of the stand, and align the bolts with the three holes in this plate. Include the reinforcing plate in your grip of the press and stand, holding them together while you put a lockwasher and hex nut on one of the bolts.
Once you have a complete bolt, washer, lockwasher, and nut fastened finger tight, you can then use both hands to secure the other bolts with their lockwashers and hex nuts. Then tighten the bolts and nuts securely. The assembly and mounting of the press is now complete. The CSP-B Bench Stand can be ordered from Corbin's on-line shopping cart using VISA or MasterCard, by e-mail, fax, phone, or mail to the address shown below: |
|
|
|
|
| Home Page | Price List | E-Mail Sales | Site Map | New Products | Auto Q&A | Terminology |
| Retirement | Specials | Real Estate | Software | How to swage | Classified Ads | Feedback |